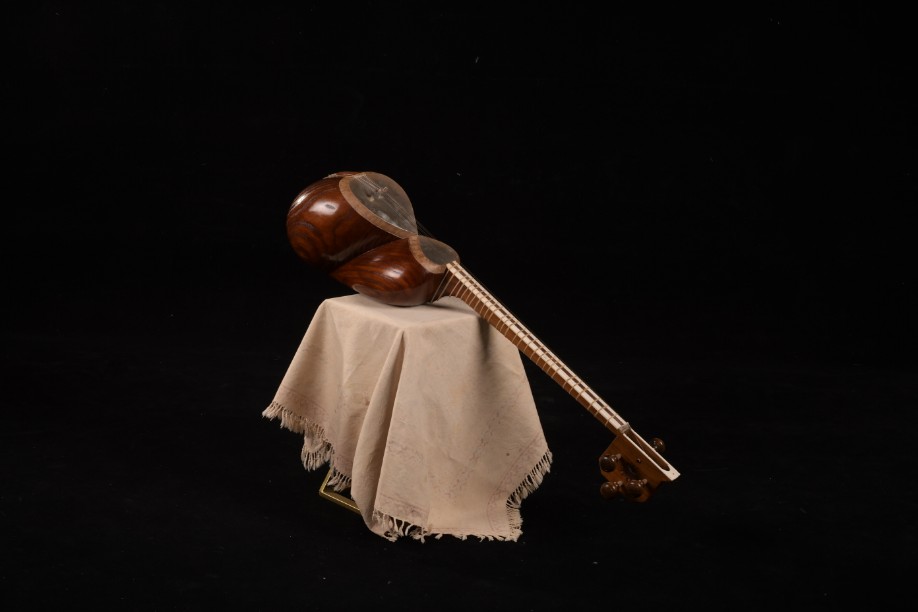
training for making tar
Whatever I say, everyone has said that everyone has gone to the Garden of Knowledge
Greetings to all the professors and art students who read my manuscripts with their loving eyes. Although I know that sometimes the content is repetitive, but for my part, maybe a dear friend who visits this site will find it useful and a small problem will be solved by him in the field of construction. In the mentioned matters, they see that they must inform me
Also, I apologize if the content is short or abbreviated or the full title is not explained, and I am ready to respond as much as I can to all my dear friends.
Isfahan,2010
Index
1. Choice of wood
2. Cutting and teleportation
3. Start lathe
4. distillation
5. Handles and claws
6. Connecting the handle to the bowl (handle level)
7. Making kharak
8. Align the edge of the warp bowl
9. Paint and under paint
10. Selection of wire, curtains, skin
Choose mulberry wood
For many years, the use of mulberry trees for wound structures such as: tar, setar, dotar, tanbur has been common in our beloved Iran. On the other hand, the mulberry tree had a sacred place and a special place among the people, so that they did not do it until they had to cut it down, even if they paid good money to buy the tree, they did not consider. On the other hand, in most cities and villages, this tree was propagated and even in some areas there were places dedicated to growing this tree (to produce mulberry leaves for silkworms) and even recently in some cities in The season of mulberry ripening People go to these places and use its delicious fruit. (West Azerbaijan, Urmia). And even after a few decades, some people still do not know how to make a living this way.
Anyway…
Choosing mulberry wood for the bowl:
1. Freshly cut tree.
2. It should not be on the bark of a branch tree (because it disrupts the order of the wood veins).
3. The diameter of the selected wood should be between 50 and 60 cm.
4. The distance between the annual wood veins is between 6 to 8 mm.
Very wide streaks of about 20 mm indicate the waterlogging of the tree where the tree grows or the tree is barren. On the other hand, if the distances are not uniform, for example, 5 mm for several years and 15 mm for several years, it indicates waterlogging and dehydration where the tree grows. This condition is not good in terms of wood material, on the other hand, it is not beautiful in the end.
5. The wood vessels should not be complicated. From the cross section of the tree that we look at the annual ring, the wood vessels should be in the middle of the tree trunk. Cut trees were used to find geographical direction.)
Most of the trees that have grown next to the walls of gardens or old buildings, their water intake is inclined to one side and is not in the center, and this wood is not suitable for cutting bowls (in terms of beauty).
vena inclined to one side
At the time of cutting, this work must be done with great care and patience by skilled craftsmen so that the tree that has reached us for many years is not destroyed with a small carelessness. This tree is our national capital and now someone is looking for propagation.And this tree is not revived
2. Cutting and cutting wood
The length of the trunk used for the tar bowl is about 55 cm. It is about 15 cm larger than the original pattern, and this is because if a small crack or rot is seen after cutting the water intake, we can play with the pattern and play a few centimeters somewhere.
Mark the two sides of the desired trunk and cut the wood by 2 cm with a chainsaw. Now our trunk is cut into two longitudinal semicircles.
Now, as shown below, we place the rectangular pattern according to the shape on the cross section of the trunks and cut their excess.
Note that if we want our tar to be four flowers, we must be more careful when cutting the rectangular pattern so that some of the white bark of the tree remains at the end of cutting the bowl. Then place the round pattern on each of the lips and use a saw We move the pulley away. Make sure that the bowl is on the side of the root and the handle is on the side of the branch.
Start latheing
First, the beginning and the end of the sticks are impregnated with wood glue and the two pieces of the bowl are glued together with a few points with wood glue and left in the open air for 24 hours.
Then we draw the pattern of the mouth of the bowl and the small bowl on the wood and draw the size of the end of the handle from the edge of the small bowl on the wood. Using a saw, cut the excess at the end of the handle and next to the small bowl
Draw a curved line between the bowl and the tin and cut it up to 6 cm from the back of the bowl and up to 3 cm from the openings.
Using a Chisel 25 mm open groove, start cutting out of the bowl. Be careful of the curvature of the bowl, as it is not possible to compensate for the mistake. Reduce the load.
After cutting the outside of the bowl and the approximate form, we separate the two glued pieces with a grater blade.
Draw a line around the edge of the bowl at a distance of 4 cm and start trimming the inside of the bowl with a chisel. Make sure that the wood is wet and the thickness of the work is not reduced.
Every day after finishing the work, pour the wood chips into the bowls and put them in a large plastic bag and close the plastic door. This will prevent the wood from cracking and wrapping. After the bowls lighten, put them in the plastic. And leave a corner open. It takes 3 to 5 months for the bowls to be removed from the plastic.
Wood sap
The thing that should be mentioned before cutting the bowl is wood juicing, which has long been used in traditional instrument making. In this way, the tree that was being cut was placed in the path of running water so that the sap of the tree would come out of the wood tissue. . After 3 to 5 months, a thick black juice comes out of the wood. Now put the bowls in the plastic and let it air over time (about 5 months) to dry.
Handles and claws
The main wood for the handle is walnut (of course, apricot wood has also been used and will be). A noteworthy point for choosing wood is the density of the wood. Walnut wood is sometimes seen that is very dark and well-cut, but their density is high. (Mass per unit volume)
Care must be taken to maintain balance after the bones are installed and not to disturb the player’s hand while playing the instrument. . Therefore, the beauty of the wood used for the handle and the claw is one side of the subject and on the other side is the finished weight of the instrument. . I also point out that we do not mean the use of white and hollow wood .
After cutting the wood for the handle with a weak blow to it, you can test its quality and sound .
Cut handle wood
As mentioned earlier, the direction of the wood is important for cutting the handle. So that the annual rings should be perpendicular to the bowl. The selected wood should be straight and without knots. The dimensions of the wood for the handle are 4 × 6 × 50, the additions of which are removed during the payment process.
Claw head
Walnut wood and our joints between it is also walnut. The veins of the claw wood are in line with the veins of the handle wood. Sometimes it is seen that the tar phone is locked in the head of the paw or vice versa. Also, when changing the wire, it can be seen that a step has fallen on the stem of the phone, which is due to the softness of the wood used for the phone. The choice of wood to carve the phone plays an important role in resolving these problems. If the wood material of the phone is too hard, it will cause the hole of the claw to widen over time, and if it is too soft, the stem of the phone itself will give an edge and will not allow the phone to stiffen in place on the claw and will be wasted. spins .
اIf the wood used for the claw and ear is of the same material, you will not face these problems.
The finished weight of a TAR after polishing is between 1900 and 2200 grams, which depends on the density of wood that is selected for the bowl and handle. On the other hand, be careful because the wood used for the bowl has a lot of variety (hardness and softness), the same thickness can not be used for all woods. .
The point that should be mentioned is the weight of each bowl at the time of internal cutting, so that we open the bowl whose outer form is finished and has nothing to do except pay, and we start working, and after each time working inside We weigh the bowls with scales .
The weight of the bowls for each bowl is approximately between 850 and 950 grams, as mentioned, depending on the hardness or softness of the wood used. .
Connect the handle to the bowl
After the arches on the handle are done and the betel is installed on the handle, now it is time to connect the handle to the bowl. . When connecting the handle to the bowl with a precise metal ruler, 80 cm after the crotch and tongue are ready, connect them and now place the ruler on the male side on the handle and the edge of the bowl. . We have to carefully monitor the three points until the end of the work .
1.The edge of the bowl
2.Edge of small bowl (end of handle)
3.Base connection
The ruler should be stuck at points 2 and 3 and at point 1 should be about 2 mm air intake, ie the edge of the bowl should be lower than the other two points
Note: If the edge of the bowl (side of the wire holder) is more than 2 mm lower, the bottom of the handle will definitely not read .
If the edge of the bowl (the side holding the string) is higher than the two points mentioned, the strings become very stiff and the player’s left hand is annoyed. Have definitely encountered such a problem, so fine-tuning the handle when connecting is very important. .
After carefully adjusting the handle, we glue the junction of the crotch and the tongue with a hot-work glue
After connecting the handle to the bowl, it is time to install the bones on the TAR handle .
. It should be noted that only the use of animal glue or cutting the bowl with a Chisel is not a reason to read the TAR , and observing many points will make the TAR read, but for blurring that works according to scientific and precise principles (observing the thickness of the turning to The fit of the wood used, the choice of quality wood, the correct and accurate alignment of the handle to the bowl, the alignment of the edge of the warp bowl, etc.) definitely plays a role and has a great effect.
Making a vault, wire holder
By selecting an old ram horn, we first cut about 2 to 3 cm from the bottom of the horn transversely with an iron saw, and then cut 6 cm, 6 cm transversely to the top of the horn. .
Now examine each of the cut pieces and cut them lengthwise accordingly and carefully
Vault: Take the thickest cut piece and examine both sides of it and prepare it from a rectangular cube with dimensions of 50 × 30 × 15 mm. .
I stick the vault pattern I see on a piece of horn and cut it around with a saw. The saw blade used is number 2 or 3. After removing the horn, we start paying with File You can see the beauty and elegance of the vault in the photos of the vault taken from the TAR of Master Yahya. For wire catchers and Simrad, by selecting the appropriate horn from the remaining pieces of the modeling horn, discard and then pay.
Align the edge of the TAR bowl
1.We close the bowl on the table from the end of the handle to the clamp
2.Place a ruler vertically on the longitudinal seam of the bowl and the side of the wire holder (A) and the base of the handle.
3.By a string (plumb line) that we hang from the ruler to the bottom of the bowl to reach the bottom of the bowl where the seam at the bottom of the bowl.
4.Shake the bowl between the clamps until the plumb line is right on the seam line at the bottom of the bowl.
5.Make sure the clamp is tight.
6.Mark 5 cm from the end of the bowl and 1.5 cm from the end of the tin towards the junction of two openings or two hearts.
7.Now place the balance on the edge of the bowl and the tin and determine which points are up or down. (Four points A, B, C and D)
These four symbols will not be erased or changed at all until the end of the work.
8.We place a glass on the opening of the TAR. The only contact points of the bowl with the glass are points A, B, C, D.
9.Now we run the bowl drop which is between 6 to 7 mm
10.Use the dividers for fine tuning and beautiful execution.
Now we implement the connection of two small and large openings, which end at about 6 mm..
12.Place the dividers again between the two hearts of the bowl and the tin, and measure both sides of the tin and the bowl under the glass.
Paint and subcolor
Varnish and alcohol must be prepared for the paint. The lacquer available in the market is available in two colors, brown or white (transparent). Prepare one of the two varnishes to suit your taste and mix it with alcohol.
The amount of varnish and alcohol combination:
Usually 100 grams of varnish should be dissolved in 600 cc of alcohol (one bottle of alcohol) . The best temperature for combining varnish and alcohol is 25 to 30 degrees. In winter, be sure to place the alcohol near the heater to raise the temperature and then mix with the varnish. Pour the lacquer into the alcohol bottle and close the lid and shake it a little. After a few minutes the varnish dissolves in alcohol. Pass it through a strainer several times and pour it into a clean bottle.
It is necessary to mention that in some cases, adding varnish to alcohol does not dissolve the varnish in the bottle and the bottom of the bottle settles. In this case, either our varnish is rotten or our alcohol is not of good quality and the percentage of alcohol impurities is high.
Under the color maker
The best and most beautiful color for the TAR is the same color that the mulberry wood shows over time (3 to 5 months). If the final payment of the warp is done, you can put the warp in a place where direct light does not shine on it and rotate it every week. You can see that after 3 to 5 months, the color of the wood has changed from yellow to light or dark brown, which is very beautiful and ready for varnish. .
But in some cases, the person ordering the TAR wants a color other than this color, so the sub-color should be used. There are several types of sub-paints used for wood, some of which are for doors and decorations, but the most commonly used sub-paint is sodium bichromate. You can get this powder from chemical stores. The solvent of this powder is water. The amount of composition in your hand so that the more water you add, the lighter the color becomes.
Be sure to work with gloves and a mask when mixing with water. Be sure to test the prepared paint on a piece of wood first. Now start hitting under the color and paint one pass of the whole bowl. Be careful to do this quickly and do not repaint the previously painted and dried areas, because your work will be two colors. Rest for 24 hours after a sub-color pass and then start varnishing. The undercoat is always two to three shades thicker after the varnish, so make sure your instrument is not too dark.
Align on the TAR handle
When the back of the handle is ready and the dimensions of the handle are ready to be attached to the bowl, the width of the handle at the top and bottom (35-36 mm) or (36-37 mm) and the arch behind the handle are done, before sticking the betel in the middle of the handle. Mark (about 23 cm) and arc the middle of the handle about 0.7 mm with a hand grater. Check with a ruler to remove the load evenly. Now mark the location of the betel with a dash to mark the two sides of the handle where the bone should be glued. Now grate both sides of the handle as shown below, ie where the bones are located, with a hand grater.
Then stick the betel on the handle exactly where we marked it with the dark with a animal glue. After 24 hours, it is time to connect the handle to the bowl, the steps of which have already been mentioned. .
Some masters make arches on the handle after attaching betel and bone .
Continue in the coming weeks ,,, Thank you for your support